
I spent most of a season riding a shock that was 15 psi over-pressured because I never bothered to check it against my actual riding weight. The bike felt “fine” — until I borrowed a buddy’s dialed-in rig for one lap and realized how much traction I’d been leaving on the table. Rear shock setup isn’t glamorous, but it’s the difference between a bike that tracks the ground and one that skips across it.
This guide walks through sag, rebound, and compression in the order you actually need to set them, plus when tuning stops being enough and a real service is due.
Why Rear Shock Setup Actually Matters
A rear shock isn’t just there to soften bumps. It’s what keeps your back tire loaded and gripping through roots, off-camber turns, and braking bumps — the stuff that actually determines how fast and how confidently you can ride. Get it wrong and you’ll either feel every root through your spine or watch your bike wallow and blow through its travel on anything steeper than a fire road.
Dial it in, and the difference shows up immediately: more predictable cornering, less arm and leg fatigue by the end of a long descent, and a bike that feels planted instead of skittish. It’s one of the highest-value ten-minute jobs in the whole main guide to mountain bike components.
The Three Adjustments, In Plain Terms
Sag
Sag is how far your shock compresses under your own body weight, in full riding gear, before you’ve hit a single bump. It’s your baseline — get sag wrong, and every other adjustment is built on a bad foundation.
Rebound
Rebound controls how fast the shock extends back out after it compresses. Too fast, and the bike kicks back at you off successive hits — riders usually describe this as feeling “bucked.” Too slow, and the shock never fully recovers between bumps, so it gradually rides lower and lower through a rock garden, a phenomenon called packing down.
Compression
Compression is the resistance the shock offers as it’s being pushed into its travel. Entry-level shocks usually give you a simple firm/open lever; mid-range and greater shocks split this into low-speed compression (LSC), which governs how the bike handles pedaling input and small bumps, and high-speed compression (HSC), which handles bigger hits like drops and square-edge impacts.
What You’ll Need
- A shock pump — a standard floor pump won’t read air pressure accurately enough to matter here.
- A tape measure
- Something to log numbers on — your phone’s notes app works fine
- Full riding kit, including your hydration pack if you normally ride with one
- A second pair of hands is genuinely useful for the sag check, but not required
Setting Sag: Get the Foundation Right
- Set the damper to open fully. Turn the compression lever counter-clockwise until it stops. RockShox’s official setup guidance is explicit: the damper needs to be fully open, with adjusters turned counter-clockwise until they stop, before you take a sag reading.
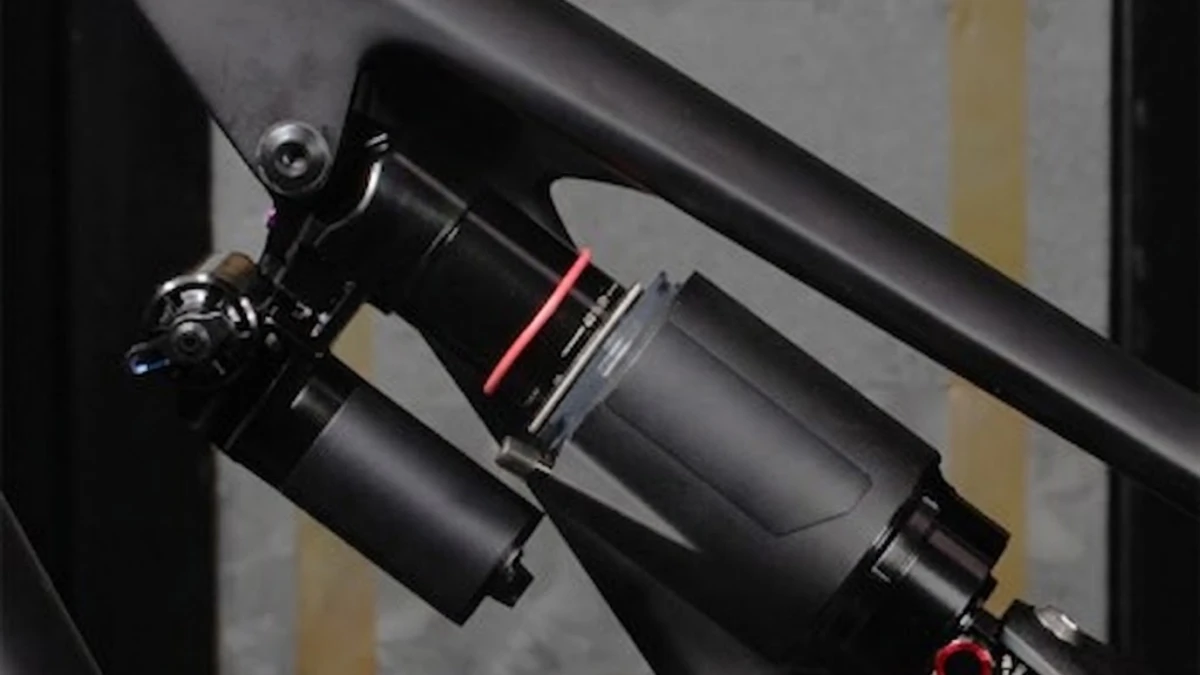
- Slide the O-ring down to the shock body — or if it’s missing, note the shaft’s exposed length as your zero point.
- Start with a baseline pressure. Check your frame manufacturer’s chart if one exists; if not, most riders land somewhere in the 150–300 psi range depending on shock volume and rider weight, so start conservative and adjust.
- Cycle the shock a handful of times unweighted to equalize the air chambers before you take a reading.
- Sit on the bike in full gear, in your normal riding stance, and have someone steady you (or lean against a wall) while you settle in without bouncing.
- Step off carefully without disturbing the O-ring, then measure the gap from the O-ring to the shock body. Divide that number by total shaft travel and multiply by 100 for your sag percentage.
- Adjust air pressure — add air if sag reads high, release air if it reads low — and repeat until you’re in your target range.
Discipline-specific targets matter here. Sag ranges aren’t one-size-fits-all: cross-country and trail bikes generally run less rear sag for pedaling efficiency, while enduro and downhill bikes run more for confidence on steep, fast terrain. Roughly 25–30% suits XC and trail riding, while 30–35% is more typical for enduro and DH setups, though your specific frame’s leverage ratio will shift that window somewhat.
Write your final pressure down. It’s your reference point for every ride after this one.
Tuning Rebound on the Trail
- Find your rebound dial — usually red, marked with a tortoise and hare or a plus/minus scale.
- Start fully open (counter-clockwise, toward the hare) as your baseline.
- Do a quick compression test: push down hard on the saddle and let go. If the bike springs back sharply, rebound is fast. If it feels like it’s slowly settling back up, it’s slow.
- Ride a familiar section of trail with real bumps — a parking lot test only tells you so much.
- Feeling bucked or kicked off bumps? Add 1–2 clicks of rebound damping (clockwise) and try again.
- Feeling dead, or like the bike is riding lower through repeated hits? Remove 1–2 clicks and retest.
- Repeat in small increments until the wheel feels like it’s tracking the ground instead of skipping across it or dragging behind it.
Log your final click count from fully open. You’ll want this number again after a shock service resets everything to baseline.
Dialing In Compression
If your shock has a simple lever, this part is quick: open for descending and rough terrain, firm or climb mode for smooth climbs where you want to cut pedal bob, and a middle “trail” setting for mixed terrain where you’re doing both.
If you’ve got LSC and HSC adjusters, treat them as fine-tuning tools, not something to overhaul on every ride. Add low-speed compression if the bike feels like it’s wallowing under pedaling load or diving under braking. Add high-speed compression if you’re blowing through travel on big hits or hard landings. Small, deliberate changes — a click or two at a time — get you further than chasing a “perfect” setting that doesn’t exist.
Tuning vs. Servicing: Know the Difference
Sag, rebound, and compression are all external adjustments — they don’t touch what’s happening inside the shock. That part matters more than most riders assume. Per FOX’s official service interval schedule, air sleeve maintenance on FLOAT and DHX Air shocks is due every 30 hours. In comparison, a full suspension fluid service is due every 100 hours or annually—whichever comes first, sooner if you’re regularly riding in wet, muddy, or dusty conditions. No amount of clicking a rebound dial fixes a shock that’s due for fresh seals and oil; if your setup feels harsh or inconsistent even after a proper tune, that’s usually the actual culprit.
Bringing It Together on the Trail
Once sag, rebound, and compression are set, the real test is a proper ride, not a parking lot bounce. Pay attention to a few specific things:
- Is your rear wheel staying planted through braking bumps and off-camber roots, or skipping?
- Are you bottoming out harshly on drops or landings? Add a touch more pressure, a few psi at a time.
- Does the bike feel harsh and pogo-like on small chatter? You may be overdamped on rebound, or running too much pressure.
- Are successive hits throwing you forward? Slow the rebound down.
None of this happens in isolation, either — a bike’s geometry decides how that stability actually feels on a descent. So a slack head angle paired with a well-tuned shock feels genuinely different than the same shock on a steep, XC-oriented frame. And if you’re still deciding what you’re even setting up, our guide comparing hardtails and full-suspension bikes is worth a read before you buy your first shock pump.
Keep a Log, Keep Adjusting
Suspension setup isn’t a one-and-done job. Trail conditions shift between wet and dry, your weight changes with the seasons, and gear you add or drop off your pack changes your baseline sag. Keep your numbers logged — pressure, rebound clicks, compression setting — so getting back to a known-good baseline after a wash or a swap takes minutes, not another half-day of trial and error.
Treat your fork and shock as one system rather than two separate projects — setting up your fork the same way closes the loop on the rest of your suspension. Dial both in together, and the whole bike starts feeling like it’s working with you on the trail instead of against you.